前言
偶然间使用 lastb 看了下登陆失败的日志,瞬间惊了。每天都有几十个 IP 进行上百次的暴力破解。
[root@konekomoe:~]# lastb | grep "root" | grep "Sat Feb 22"
......
root     ssh:notty    71.88.xxx.xx     Sat Feb 22 06:08 - 06:08  (00:00)
root     ssh:notty    71.88.xxx.xx     Sat Feb 22 06:08 - 06:08  (00:00)
root     ssh:notty    71.88.xxx.xx     Sat Feb 22 06:08 - 06:08  (00:00)
root     ssh:notty    71.88.xxx.xx     Sat Feb 22 06:08 - 06:08  (00:00)
root     ssh:notty    71.88.xxx.xx     Sat Feb 22 06:07 - 06:07  (00:00)
root     ssh:notty    71.88.xxx.xx     Sat Feb 22 06:07 - 06:07  (00:00)
root     ssh:notty    71.88.xxx.xx     Sat Feb 22 06:07 - 06:07  (00:00)
root     ssh:notty    71.88.xxx.xx     Sat Feb 22 06:07 - 06:07  (00:00)
root     ssh:notty    71.88.xxx.xx     Sat Feb 22 06:07 - 06:07  (00:00)
root     ssh:notty    71.88.xxx.xx     Sat Feb 22 06:07 - 06:07  (00:00)
root     ssh:notty    71.88.xxx.xx     Sat Feb 22 06:07 - 06:07  (00:00)
......
准备做点防止暴力破解的措施的时候,突然想到,可以直接禁用使用账户密码登陆的方式,改用密钥验证。这样,就安全很多,也更方便。
Windows
以 Xshell 及 Debian 为例。

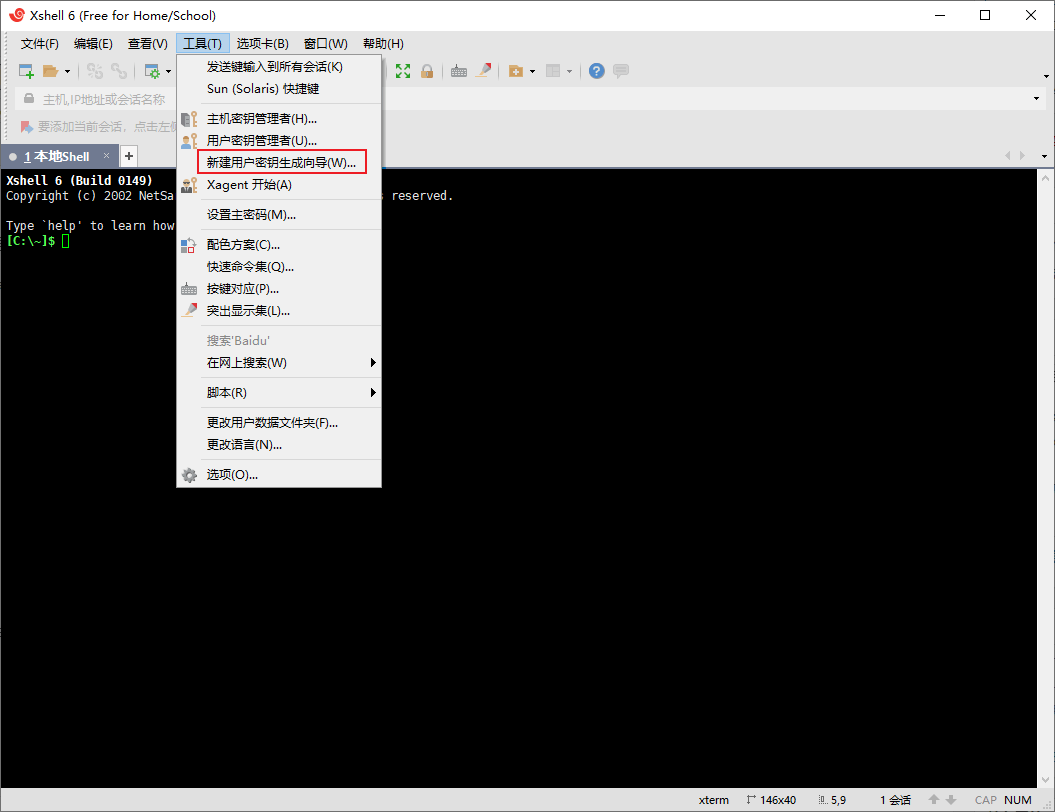
依次点击“工具 -> 新建用户密钥生成向导(W)...”。其中“密钥类型”和“密钥长度”保持默认,点击两次下一步。根据提示,键入“密钥名称”和“密码”,其中密钥名称可保持默认。再点击下一步。

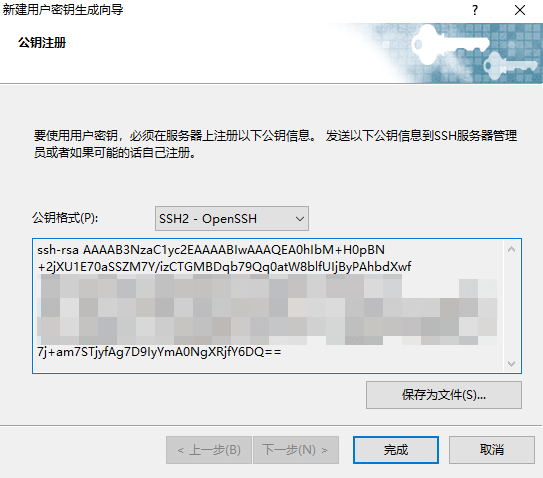
此时就看到了这个界面。为了方便,直接把公钥复制下来。
登陆 Linux 的服务器。在 ~ 目录下创建一个名为“.ssh”的目录。
mkdir ~/.ssh && nano ~/.ssh/authorized_keys
将刚才复制的公钥粘贴在新创建的文件里,使用 Ctrl + X 并键入 y 保存。再更改 authorized_keys 的权限。
chmod -R go= ~/.ssh
值得注意的是,如果使用 root 账户为其他账户操作,还需要把用户和用户组更改为对应的账户。
chown -R user:usergroup ~/.ssh
更改 sshd 的配置,禁用密码登录。
nano /etc/ssh/sshd_config
使用 Ctrl + W 搜索 PasswordAuthentication。如果被“#”注释,去掉,并将后面的 no 改为 yes。使用 Ctrl + X 并键入 y 保存。
重新载入 sshd 配置。
systemctl reload ssh
此时,先不要急着关闭连接。建立一个新的选项卡,测试是否不能登录。
ssh root@ip
如果不能使用 Password 登陆,则配置生效。此时,再测试使用 Public Key 是否能登陆。
成功后,可关闭之前的连接。
Linux
以 Raspbian 为例。
先在客户端(需要 SSH 连接其他服务器的计算机)上生成一个密钥对。
[pi@raspberrypi:~]$ ssh-keygen
Generating public/private rsa key pair.
Enter file in which to save the key (/home/pi/.ssh/id_rsa): 直接回车即可
Created directory '/home/pi/.ssh'.
Enter passphrase (empty for no passphrase): 还是建议输入密码
Enter same passphrase again: 重复密码
Your identification has been saved in /home/pi/.ssh/id_rsa.
Your public key has been saved in /home/pi/.ssh/id_rsa.pub.
The key fingerprint is:
SHA256:CojzzIIDUHxyqlYelXuAvasKMNZlexMh5VW0y/8OIqU pi@raspberrypi
The key's randomart image is:
+---[RSA 2048]----+
| .. o.oo .oo     |
| .o.o=o o   .    |
|.  =.o+o   .     |
|..o+oo... . .    |
|*o+.o.ooS  +     |
|*B . o... o .    |
|* + . .  E . o   |
|.o .      . . o  |
| ..           .o |
+----[SHA256]-----+
将公钥传送到其他计算机(还是在客户端)。
pi@raspberrypi:~/.ssh $ ssh-copy-id root@ip
/usr/bin/ssh-copy-id: INFO: Source of key(s) to be installed: "/home/pi/.ssh/id_rsa.pub"
The authenticity of host 'xx.xxx.xxx.xxx (xx.xxx.xxx.xxx)' can't be established.
ECDSA key fingerprint is SHA256:BuueQ3ub6j+uffNcaxw6SRvRzPtKEmYGFP/SCqMBerE.
Are you sure you want to continue connecting (yes/no)? yes # 这里输入 yes 并回车就好
/usr/bin/ssh-copy-id: INFO: attempting to log in with the new key(s), to filter out any that are already installed
/usr/bin/ssh-copy-id: INFO: 1 key(s) remain to be installed -- if you are prompted now it is to install the new keys
root@ip's password:此处输入其他计算机的 SSH 密码。
更改 sshd 的配置,禁用密码登录。
nano /etc/ssh/sshd_config
使用 Ctrl + W 搜索 PasswordAuthentication。如果被“#”注释,去掉,并将后面的 no 改为 yes。使用 Ctrl + X 并键入 y 保存。
重新载入 sshd 配置。
systemctl reload ssh
使用 ssh username@ip 测试能否成功登陆。如果成功,即可断开与服务器的连接。